|
| Nene |
See what I did?
Yeah, I know it's not great if you have to explain it.
*Sigh*
I find myself explaining
a lot
To the point where I don't want to speak
to any one
any more.
 |
| Honu |
 |
| Beach scape |
I get my "bah humbugs" early
Or late
I can never decide which.
I want to hibernate.

This doesn't mean I haven't been busy.
I wandered into appliqueing again via a few things bought in Hawaii last years and never gotten to.
When I realized I never showed you all The Honu (turtle) protector of the islands! I finished him before thanksgiving
The Nene, Hawaii's state bird, not quite done. The baby nene still needs it's beak& legs, the corner stones need to be done and then the berry vine they like to eat needs doing.

And the beach-scape background has been started it will have a lady swinging on a hammock with her quilting and a drinky

Then I found out my oldest and dearest friends mom has breast cancer so I'm making her a snuggle quilt for when her chemo gets going.
Also linking with
Oh Scrap! cause everything I do is scrappy!
I hope it's cheerful enough for when she can't manage
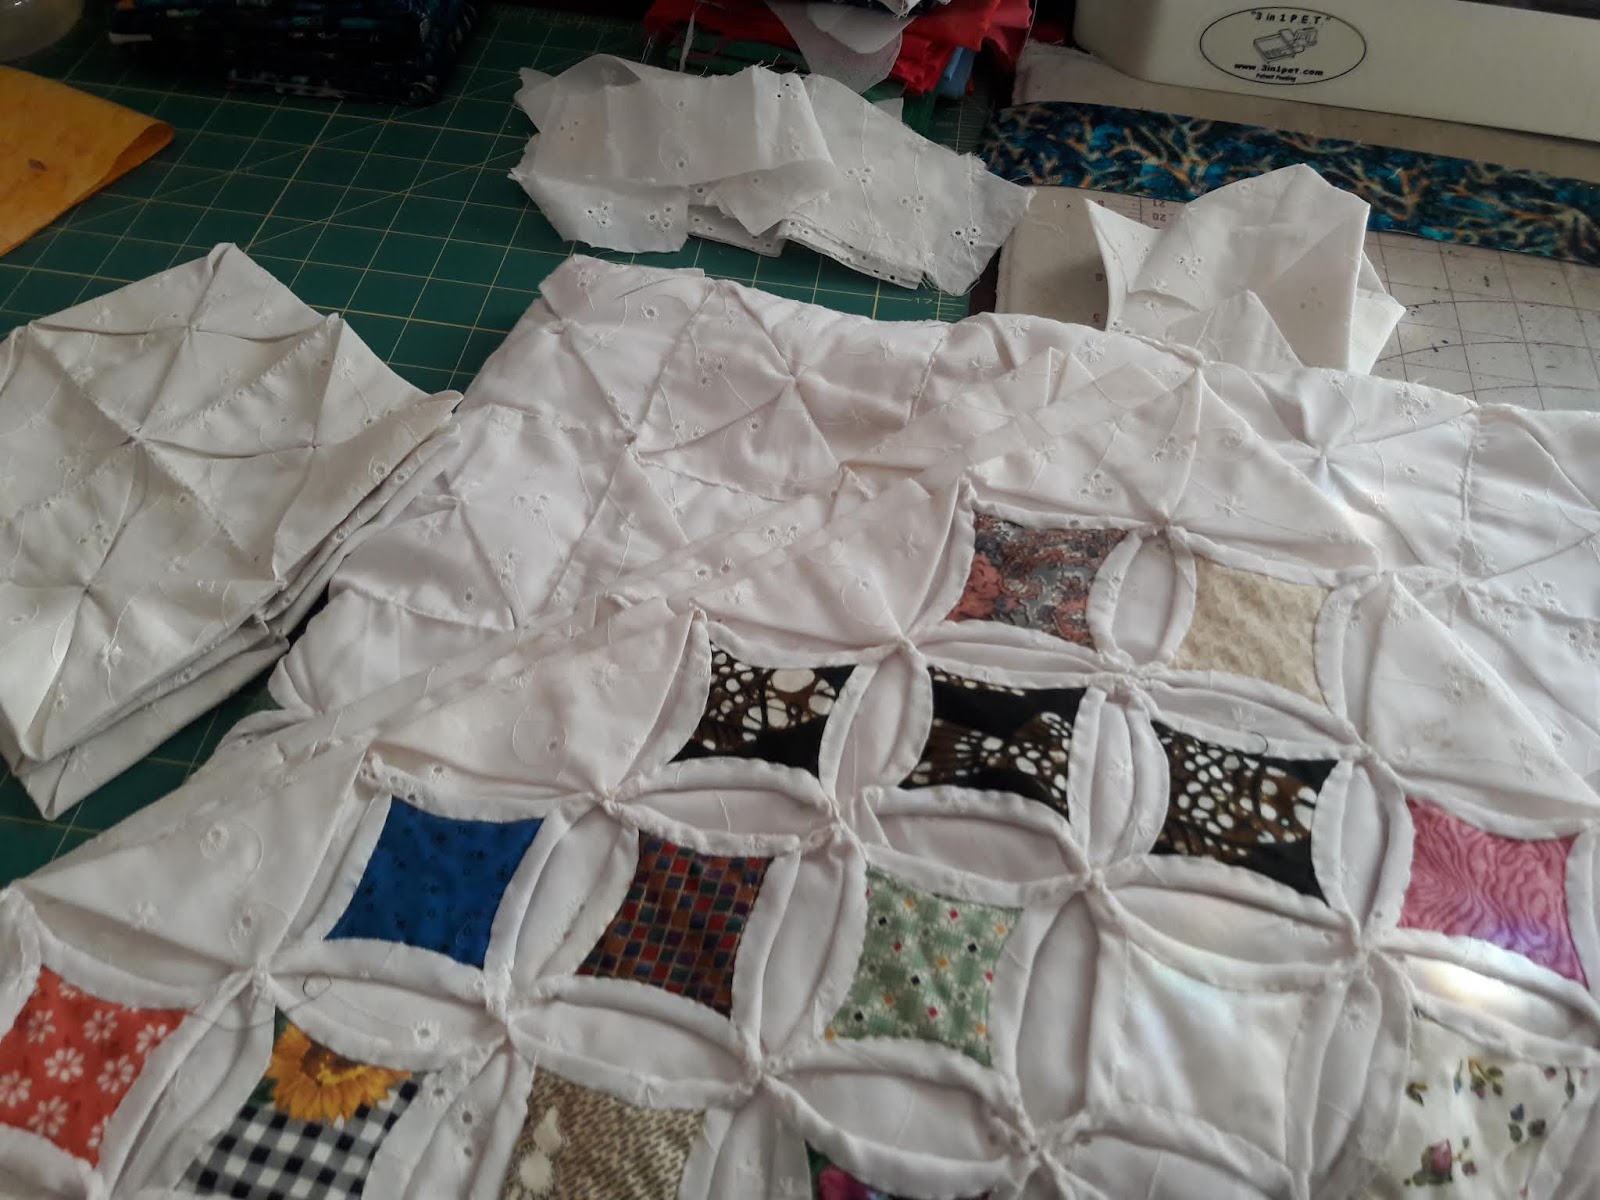
I also found an OOOOld UFO!

A cathedral windows quilt I started back when my old, old , old machine died so I'd have
something to do.
I don't remember when I put it aside but it went everywhere with me for a while.
This is a great project if you travel a lot.
It takes up a minimum amount of space and you only need a pin cushion a needle, scissors and thread
Unless you let it grow out of control then it's like kudzu, everywhere all at once!
I'll show you how easy it is,
you need an even amount of 7" squares of whatever cotton you like,
I've used eyelet lace renovated from an old skirt here.


Fold the square in half
and sew both ends
Leaving the long end opposite the fold open
Turn inside out so the seams are not showing
Like this

Now open the pocket till you form a square
The seams should form a straight line right down the middle
(where my finger is pointing in the picture)
Crossed by the raw edge. and Iron nice and flat.
Don't worry about finishing this as it will be under all the folds that are coming next.

Fold like an envelope so all the points meet in the middle.
Iron nice and flat again.
Now sew just the tips of the points together so they all meet in the center.
Leave it floppy so you can put your finger underneath it.
I'll tell you why in a minute
Now sew the whole mess together!
I like a fast and easy whip stitch here

Don't worry about being too neat they will all be hidden by the 2"-2.5" squares you are going to use for the window effect
BTW this is a great project for those 2"-2.5" charm square packs you have lying around
Now place a square right in the middle of the square formed by your seams, pin it.

See how my finger is demonstrating how to fold over the edge?
That is how you are going to cover all those raw edges!

Now pin the corners down
then pin the fold over right in the middle
The ends should fold over automagically
If they don't it shouldn't take to much encouragement to make 'em
Pin them down too.
Sew down.

I use a scoop stitch method here.
Sorry about the blurry but it's hard to sew and take a picture!
This is why I leave the center points floppy,
so I can get my finger in there to sew it all down!
If you want to sew it down when you have finished the patches on either side go ahead

Now those pesky corners........
Take a stitch so you catch both sides of the fabric
As I have shown here
Pull thread through

Take another stitch where you went in initially
Then angle your needle ( Like in the picture)
catch the other side of the fabric
Pull through

Both sides should pull together making a neat point
Scoop stitch to the bottom where your next stitch will go
Rince/repeat until you are done.
If you have never done one of these before I would start with just 4 squares
See how you like doing it before you go crazy

Like I said, Kudzu.
Now for those of you who noticed this clever little thing and want one, Extra credit!
It's easy-peasy!
Requires 1- 3.5" square
Folded in half as a triangle, right sides together.
Sew along both edges, leaving enough room, so you can turn it and stuff it.
Don't go to crazy and don't use batting, unless its really loose fluffy batting.
Hand sew the seam closed when you are done.
Now take both bottom ends of your triangle, where the fold is.
Sew them together, securely, nice and tight.
and Voila! A pin cushion ring! Brilliant!
Bonus fact, if you fill the end point with walnut shells (about half way) before you stuff it you will have a bit of needle sharpening.
I don't recommend emery, unless you are using a really tight weave fabric - OR - you want to double up on fabric.
Because after a while using it, the emery will start to leak out through the needle holes and leave you with a floppy pin cushion.
I get my walnut shell from the pet store, in the reptile bedding section.
It's a huge bag that, will last you for ever, so be warned.

 So this cq has taken a long time to finish.

 I was looking at it hanging there on the curtain in my sewing room and decided,